

Why You’ll Love This Spring Onion Bhajis
This spring onion bhajis recipe is a go-to for anyone wanting a tasty snack that’s simple to whip up. With fresh spring onions bringing a crisp bite and spices adding just the right kick, these bhajis make a great appetizer or side dish for any meal. They’re perfect for busy days when you need something quick yet satisfying.
One reason you’ll enjoy making spring onion bhajis is how easy they are to prepare. This recipe uses straightforward steps and common ingredients, so even if you’re new to cooking, you can create crispy bhajis in under 30 minutes. Plus, the mix of spices like turmeric and cumin adds a burst of flavor that keeps things exciting without overwhelming your kitchen.
Health-wise, spring onion bhajis pack in nutrients from fresh veggies and chickpea flour. Spring onions provide vitamins and antioxidants that support your immune system, while chickpea flour offers plant-based protein and fiber to keep you full longer. For more on how ingredients like chickpea flour boost your health, learn about the benefits of chickpea flour.
The versatility of spring onion bhajis makes them adaptable to various diets. You can easily make them vegan or gluten-free, and they pair well with different meals. Whether you’re serving them at a party or enjoying them as a snack, their unique taste stands out among other fried treats.
- Easy prep for busy schedules
- Nutrient-packed with fresh veggies
- Flexible for different dietary needs
- Delicious flavors from simple spices
Jump to:
- Why You’ll Love This Spring Onion Bhajis
- Essential Ingredients for Spring Onion Bhajis
- How to Prepare the Perfect Spring Onion Bhajis: Step-by-Step Guide
- Dietary Substitutions to Customize Your Spring Onion Bhajis
- Mastering Spring Onion Bhajis: Advanced Tips and Variations
- How to Store Spring Onion Bhajis: Best Practices
- FAQs: Frequently Asked Questions About Spring Onion Bhajis
- How do I make crispy spring onion bhajis at home?
- What is the best type of flour to use for spring onion bhajis?
- Can I make spring onion bhajis gluten-free?
- How should I store leftover spring onion bhajis?
- What are some popular dips to serve with spring onion bhajis?
- Spring Onion Bhajis
- Ingredients
- Instructions
- Last Step:
- Notes
- Nutrition
- Did you make this recipe?
Essential Ingredients for Spring Onion Bhajis
Gathering the right ingredients is key to making perfect spring onion bhajis. Here’s a complete list based on the recipe, ensuring you have everything measured out for success. Each item plays a role in creating the batter and adding flavor, so follow the quantities closely.
- 160g gram flour (chickpea flour) – forms the base of the batter
- 25g plain flour – helps bind the mixture
- 1 tsp ground turmeric – adds color and earthy notes
- 1 tsp ground cumin – brings a warm, aromatic spice
- 1 tsp ground coriander – enhances with a fresh, citrusy taste
- 2 tsp black mustard seeds – provides a subtle crunch and heat
- ½ tsp sea salt plus extra for seasoning – balances and enhances flavors
- 250ml chilled lager – creates a light, airy batter
- 250g spring onions finely sliced at an angle (about 12) – adds fresh onion flavor and texture
- 2 shallots finely sliced – contributes a mild sweetness
- Vegetable oil for deep frying – ensures even cooking and crispiness
For the accompanying chutney, you’ll need:
- A small bunch of mint leaves – for fresh, cooling notes
- A small bunch of chopped coriander – adds herbal brightness
- 1 chopped green chilli – brings a spicy kick
- A thumb-sized piece of chopped ginger – offers zesty warmth
- A pinch of ground cumin – deepens the flavor profile
- The juice of 1 lemon – provides acidity and tang
These ingredients make the recipe adaptable for special diets, like vegan options. If you’re exploring other easy recipes, check out our bolognese sauce guide for a hearty Italian twist.
How to Prepare the Perfect Spring Onion Bhajis: Step-by-Step Guide
Getting spring onion bhajis right involves a few simple steps that lead to crispy results every time. Start by mixing your dry ingredients to build a solid base for the batter. This method ensures the flavors blend well and the bhajis hold their shape when fried.
First, grab a large bowl and combine the flours, spices, and salt. Mix 160g gram flour, 25g plain flour, 1 tsp ground turmeric, 1 tsp ground cumin, 1 tsp ground coriander, 2 tsp black mustard seeds, and ½ tsp sea salt until everything is even. This step infuses the batter with aromatic spices that make the bhajis stand out.
Next, slowly whisk in 250ml chilled lager to form a smooth batter. The lager adds lightness and helps create bubbles for extra crispiness. Once mixed, stir in 250g finely sliced spring onions and 2 finely sliced shallots to incorporate the fresh veggies.
For the chutney, blend a small bunch of mint leaves, a small bunch of chopped coriander, 1 chopped green chilli, a thumb-sized piece of chopped ginger, a pinch of ground cumin, and the juice of 1 lemon with 2-3 tablespoons of cold water until smooth. This creates a refreshing dip that complements the bhajis perfectly.
- Heat the vegetable oil in a deep pan to 180°C.
- Scoop heaped tablespoons of batter into the hot oil.
- Fry for 3-4 minutes until golden and crisp, turning as needed.
- Drain on kitchen paper and season with extra sea salt.
- Keep warm while frying the rest and serve with the chutney.
To discover more about nutritious ingredients like spring onions, explore their nutritional value. This guide adapts easily for baking or air frying if you want a lighter version.
Dietary Substitutions to Customize Your Spring Onion Bhajis
One great thing about spring onion bhajis is how you can tweak them to fit your needs. Whether you’re avoiding gluten or cutting calories, small changes keep the recipe delicious. Start by considering alternatives for the main flour to maintain that crispy texture.
For protein and main components, try swapping chickpea flour with lentil flour for a nuttier taste, or use rice flour to keep it gluten-free. Adding mashed sweet potato can bring extra moisture and a hint of sweetness without losing the classic crunch. If you want more plant-based protein, finely chopped tofu works well in vegan versions.
When it comes to vegetables and seasonings, replace spring onions with leeks for a milder flavor or mix in grated zucchini for added nutrition. Experiment with spice blends like garam masala to change things up, and opt for avocado dip instead of traditional chutney for a creamy twist. These adjustments make spring onion bhajis versatile for everyone.
| Original Ingredient | Substitution | Benefit |
|---|---|---|
| Gram flour | Lentil flour | Keeps it gluten-free and adds variety |
| Spring onions | Grated carrots | Boosts vitamins and sweetness |
| Chutney | Tahini sauce | Offers a nutty, dairy-free option |
Mastering Spring Onion Bhajis: Advanced Tips and Variations
Taking your spring onion bhajis to the next level means trying out some pro techniques. Adding a pinch of baking soda to the batter right before frying can make them lighter and crispier by creating air pockets. This simple trick turns a good bhaji into an outstanding one without much effort.
Flavor variations keep things fresh add chopped cilantro or mint to the batter for a herbal boost, or swap chili powder for smoked paprika to introduce a smoky depth. Presentation matters too; arrange your bhajis on a plate with lemon wedges and fresh herbs to make them look as good as they taste. For make-ahead meals, prepare the batter ahead and store it in the fridge for up to 24 hours.
Here are more ways to refine your recipe:
- Use cold ingredients for a crispier result
- Fry in small batches to avoid greasy bhajis
- Experiment with herbs for new flavors
- Freeze extras for quick snacks later
To get the best crunch, always ensure your oil is at the right temperature before frying.
How to Store Spring Onion Bhajis: Best Practices
Proper storage helps keep your spring onion bhajis tasty and crisp for later. After cooking, let them cool completely before putting them away to prevent sogginess. This step is crucial if you plan to enjoy them over a few days.
For refrigeration, place cooked bhajis in an airtight container and keep them in the fridge for up to 3 days. Freezing works for longer storage lay them out on a tray first, then bag them for up to a month. When reheating, use an oven or air fryer at 350°F to bring back that fresh-fried texture.
Meal prep tips include keeping bhajis dry before storing and portioning them for easy use. This way, you can pull out just what you need without wasting any. Remember, fresh is best, but with these methods, your bhajis stay enjoyable even after a few days.
FAQs: Frequently Asked Questions About Spring Onion Bhajis
How do I make crispy spring onion bhajis at home?
To make crispy spring onion bhajis, start by thinly slicing fresh spring onions. Mix them with chickpea flour, rice flour (for extra crispiness), turmeric, chili powder, cumin seeds, and salt. Add cold water gradually until the batter reaches a thick yet fluid consistency. Heat oil to 350°F (175°C) in a deep pan. Drop spoonfuls of the batter into the oil and fry until golden brown, about 3-4 minutes per batch. Drain on paper towels and serve hot with chutney or yogurt sauce.
What is the best type of flour to use for spring onion bhajis?
Chickpea flour (besan) is the traditional and best flour for spring onion bhajis because it binds the ingredients well and gives a rich, nutty flavor. Adding a small amount of rice flour or cornflour can improve the crispiness. Avoid using wheat flour alone as it can make the bhajis dense and less crunchy.
Can I make spring onion bhajis gluten-free?
Yes, spring onion bhajis can easily be made gluten-free by using chickpea flour and rice flour instead of wheat flour. Both these flours are naturally gluten-free and create a crispy texture when fried. Just double-check any spices or packaged ingredients to ensure they don’t contain gluten additives.
How should I store leftover spring onion bhajis?
Store leftover spring onion bhajis in an airtight container in the refrigerator for up to 2 days. To keep them crispy, reheat in a preheated oven at 350°F (175°C) for 5-7 minutes instead of microwaving, which can make them soggy. It’s best to enjoy bhajis fresh, but proper storage helps maintain their flavor and texture.
What are some popular dips to serve with spring onion bhajis?
Spring onion bhajis pair well with a variety of dips. Classic choices include mint chutney, tamarind chutney, and yogurt raita. For a creamy option, a garlic or coriander yogurt dip complements the spices in the bhajis. These dips not only add flavor but also balance the spiciness and provide a refreshing contrast.
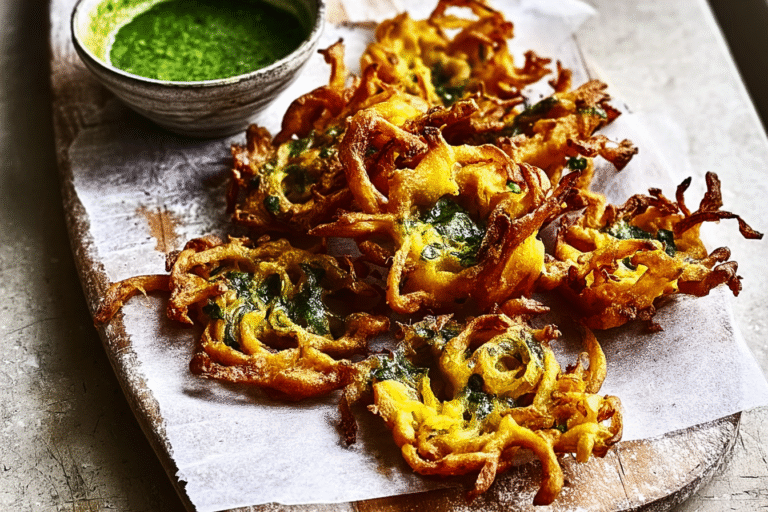
Spring Onion Bhajis
🌿 Spring Onion Bhajis with Fresh Mint and Coriander Chutney Recipe deliver a crispy, spiced snack bursting with fresh herbs and vibrant flavors.
🍋 The cool, tangy mint and coriander chutney perfectly complements the warm, crunchy bhajis, making it a delicious appetizer or light meal.
- Total Time: 50 minutes
- Yield: 4 servings 1x
Ingredients
160g gram flour (chickpea flour) forms the base of the batter
25g plain flour helps bind the mixture
1 tsp ground turmeric adds color and earthy notes
1 tsp ground cumin brings a warm, aromatic spice
1 tsp ground coriander enhances with a fresh, citrusy taste
2 tsp black mustard seeds provides a subtle crunch and heat
½ tsp sea salt plus extra for seasoning balances and enhances flavors
250ml chilled lager creates a light, airy batter
250g spring onions finely sliced at an angle (about 12) adds fresh onion flavor and texture
2 shallots finely sliced contributes a mild sweetness
Vegetable oil for deep frying ensures even cooking and crispiness
A small bunch of mint leaves for fresh, cooling notes
A small bunch of chopped coriander adds herbal brightness
1 chopped green chilli brings a spicy kick
A thumb-sized piece of chopped ginger offers zesty warmth
A pinch of ground cumin deepens the flavor profile
The juice of 1 lemon provides acidity and tang
Instructions
1-Heat the vegetable oil in a deep pan to 180°C.
2-Scoop heaped tablespoons of batter into the hot oil.
3-Fry for 3-4 minutes until golden and crisp, turning as needed.
4-Drain on kitchen paper and season with extra sea salt.
5-Keep warm while frying the rest and serve with the chutney.
Last Step:
Please leave a rating and comment letting us know how you liked this recipe! This helps our business to thrive and continue providing free, high-quality recipes for you.Notes
🍺 Use chilled lager for a light, crisp batter.
🌡️ Keep oil temperature at 180°C for even frying and texture.
🥗 Serve immediately with freshly made chutney for best flavor.
- Prep Time: 15 minutes
- Cooking time: 35 minutes
- Cook Time: 15 minutes
- Category: Appetizer
- Method: Deep Frying
- Cuisine: Indian
- Diet: Vegetarian
Nutrition
- Serving Size: 1 serving





