

Why You’ll Love This Oreo Cookie Balls
Oreo Cookie Balls are a fun and easy treat that will quickly become a favorite in your home, especially if you’re looking for something simple yet delicious. These no-bake delights combine the classic crunch of Oreos with a creamy center, making them perfect for beginners and expert bakers alike. With just a few ingredients, you can whip up a batch that satisfies your sweet cravings without much effort.
This recipe stands out due to its ease of preparation, which is ideal for busy parents or students with tight schedules. You can make these Oreo Cookie Balls in under an hour of active time, turning everyday ingredients into something special. Plus, they offer some health benefits when modified, like using low-fat options to keep things lighter while still enjoying that indulgent taste.
One of the best parts is their versatility, allowing you to adapt them for various diets without losing flavor. Whether you’re catering to vegan friends or gluten-free needs, these balls can be customized easily. Their distinctive flavor, blending cookie crunch with creamy goodness, makes them a hit at parties or as a quick snack for all ages.
Jump to:
- Why You’ll Love This Oreo Cookie Balls
- Essential Ingredients for Oreo Cookie Balls
- How to Prepare the Perfect Oreo Cookie Balls: Step-by-Step Guide
- Preparing the Chocolate Coating
- Dietary Substitutions to Customize Your Oreo Cookie Balls – Protein and Main Component Alternatives
- Dietary Substitutions to Customize Your Oreo Cookie Balls – Vegetable, Sauce, and Seasoning Modifications
- Mastering Oreo Cookie Balls: Advanced Tips and Variations
- Flavor and Presentation Ideas
- How to Store Oreo Cookie Balls: Best Practices
- FAQs: Frequently Asked Questions About Oreo Cookie Balls
- What types of Oreos work best for making Oreo Cookie Balls?
- Can I dip Oreo Cookie Balls in white chocolate or melting wafers?
- How should I prevent Oreo balls from cracking or falling apart during the dipping process?
- How long can Oreo Cookie Balls be stored in the fridge or freezer?
- Can I make Oreo Cookie Balls ahead of time and freeze them before coating?
- Oreo Cookie Balls
- Ingredients
- Instructions
- Last Step:
- Notes
- Nutrition
- Did you make this recipe?
Essential Ingredients for Oreo Cookie Balls
Gathering the right ingredients is key to making perfect Oreo Cookie Balls. This section breaks down what you need, focusing on precise measurements to ensure your recipe turns out just right. By following this structured list, you’ll have everything prepared in an organized way.
- 36 regular sandwich cookies (about 405 grams) – These provide the base crunch and iconic flavor for the truffles.
- 8 ounces (226 grams) of full-fat brick cream cheese, softened to room temperature – This binds the crumbs into a smooth, creamy mixture.
- 12 ounces (339 grams) of semi-sweet or white chocolate – Used for coating the balls to add a rich, chocolatey shell.
- ½ teaspoon of vegetable or coconut oil – Helps melt the chocolate smoothly for easy dipping.
- Optional toppings like sprinkles or crushed cookie crumbs – Add these for extra texture and decoration while the chocolate is wet.
For special dietary options, consider these tweaks to make the recipe inclusive. Vegan versions can use plant-based cream cheese and vegan chocolate. If you’re going gluten-free, choose gluten-free sandwich cookies to keep the fun going. These adjustments ensure everyone can enjoy Oreo Cookie Balls without issues.
How to Prepare the Perfect Oreo Cookie Balls: Step-by-Step Guide
Making Oreo Cookie Balls is straightforward and fun, starting with simple steps that lead to a delicious result. Begin by processing 36 regular sandwich cookies, including their filling, into fine crumbs using a food processor or by placing them in a sealed bag and crushing with a rolling pin. This creates the perfect base for your truffles, ensuring a consistent texture throughout.
Next, beat or pulse these crumbs with 8 ounces of softened full-fat brick cream cheese until fully combined, forming a smooth dough-like mixture. Scoop about one tablespoon (18 22 grams) of the mixture and roll it into balls; if it’s too sticky, refrigerate it for a bit to make handling easier. Place the formed balls on trays lined with parchment paper and chill them for at least 1 hour, or up to 3 days, to firm up or freeze for 30 minutes if you’re short on time.
Preparing the Chocolate Coating
While the balls chill, melt 12 ounces of semi-sweet or white chocolate with ½ teaspoon of vegetable or coconut oil in short bursts, stirring until smooth. Let the melted chocolate cool slightly for about 5 minutes to avoid melting the truffle filling during dipping. Dip each ball into the chocolate, making sure it’s fully coated, then return it to the parchment-lined tray.
Add optional toppings like sprinkles or crushed cookie crumbs right away while the chocolate is still wet for a nice finish. Finally, chill the coated truffles for at least 1 hour so the chocolate sets properly before serving. This entire process takes about 45 minutes of preparation and around 1 hour and 45 minutes total, including chilling time, making it a quick project for dessert lovers looking for more chocolate treats.
To help you visualize the steps, here’s a simple table outlining the key phases:
| Step Number | Description | Time Required |
|---|---|---|
| 1 | Crush cookies and mix with cream cheese | 10 minutes |
| 2 | Roll and chill the balls | 15 minutes prep + 1 hour chill |
| 3 | Melt and dip in chocolate | 10 minutes |
| 4 | Add toppings and set | 5 minutes + 1 hour chill |
Adapting these steps for dietary needs is easy, as highlighted in the ingredients section, so feel free to experiment.
Dietary Substitutions to Customize Your Oreo Cookie Balls – Protein and Main Component Alternatives
When you want to tweak Oreo Cookie Balls for different needs, start with protein and main components. For vegan or dairy-free options, swap the cream cheese with cashew-based or coconut-based alternatives to keep that creamy texture intact. If you’re aiming for a gluten-free version, use certified gluten-free sandwich cookies in place of regular ones.
You can also boost protein by adding nut butters like almond or peanut butter to the mix, which changes the flavor and makes the balls more filling. These simple swaps ensure your treats remain delicious while fitting various lifestyles. Remember, testing small batches helps perfect the balance.
Dietary Substitutions to Customize Your Oreo Cookie Balls – Vegetable, Sauce, and Seasoning Modifications
Even though Oreo Cookie Balls are sweet-focused, you can add a twist with seasonings and flavors. Incorporate spices like cinnamon or chili powder for a unique kick that surprises your taste buds. For seasonal vibes, try mixing in citrus zest or peppermint extract to elevate the flavor profile.
Allergy-friendly choices include natural sweeteners and dairy-free chocolate coatings to keep things inclusive. These modifications let you experiment while maintaining the recipe’s core appeal. It’s a great way to make the balls feel fresh and exciting for any occasion.
Mastering Oreo Cookie Balls: Advanced Tips and Variations
Once you’re comfortable with the basics, advanced tips can take your Oreo Cookie Balls to the next level. Chilling the mixture longer ensures firmer balls that hold their shape, while tempering the chocolate gives a glossy, professional finish. For flavor variations, mix in crushed nuts or caramel swirls to create personalized tastes that wow your guests.
Flavor and Presentation Ideas
Presentation matters too arrange the balls on decorative trays and garnish with sprinkles or shredded coconut for a festive look. If you’re planning ahead, prepare the balls in advance and freeze them, then dip in chocolate just before serving to save time. This method is perfect for busy schedules, like when you’re hosting a party or need a quick dessert. For more chocolate dessert ideas, check out similar recipes on our site.
Pro techniques also include avoiding overheating the chocolate to prevent it from seizing, and always stirring gently for smoothness. These tweaks make your Oreo Cookie Balls not just tasty, but also visually appealing and easy to share.
How to Store Oreo Cookie Balls: Best Practices
Proper storage keeps your Oreo Cookie Balls fresh and tasty for longer. Keep them in an airtight container in the refrigerator for up to one week to maintain their texture. For extended shelf life, freeze the balls in a single layer on a baking sheet before transferring to a freezer-safe container; they last up to 3 months this way.
- Serve them chilled or at room temperature for the best flavor.
- When meal prepping, make large batches to have treats ready anytime.
- Always separate layers with parchment or wax paper to avoid sticking.
This approach makes it simple to enjoy your Oreo Cookie Balls without fuss.

FAQs: Frequently Asked Questions About Oreo Cookie Balls
What types of Oreos work best for making Oreo Cookie Balls?
Classic Oreos are the best choice for Oreo Cookie Balls because their filling-to-cookie ratio creates the ideal texture for shaping. Double-Stuf Oreos or those with extra filling, like Mint Creme Oreos, tend to make the mixture too wet and greasy, making it harder to form the balls. Golden Oreos and standard Mint Creme Oreos have also been tested and work well, providing delicious variations.
Can I dip Oreo Cookie Balls in white chocolate or melting wafers?
Yes, you can use white chocolate or chocolate melting wafers to coat Oreo Cookie Balls. Melting wafers melt smoothly but might taste different from real chocolate. When using melting wafers, there’s no need to add oil. For white chocolate or regular chocolate, adding a small amount of neutral oil can help thin the coating for easier dipping.
How should I prevent Oreo balls from cracking or falling apart during the dipping process?
To avoid cracking, don’t freeze the Oreo balls for longer than 30 minutes before dipping, as overly cold balls cause the coating to crack. If dipping chocolate is too hot, it can break down the balls, so let it cool slightly before dipping. If balls soften or lose shape, chill them in the refrigerator or freezer for 5–10 minutes between dips to keep them firm.
How long can Oreo Cookie Balls be stored in the fridge or freezer?
After coating and setting, Oreo Cookie Balls should be kept in an airtight container in the refrigerator for up to 2 weeks. For longer storage, freeze them for 2 to 3 months. When ready to eat, thaw frozen balls overnight in the refrigerator to maintain their texture and flavor.
Can I make Oreo Cookie Balls ahead of time and freeze them before coating?
Yes, you can prepare and shape Oreo Cookie Balls in advance. Chill them in the refrigerator for up to 3 days before coating with chocolate. They also freeze well after being coated. When working in batches, keep some balls chilled to prevent softening during the coating process.
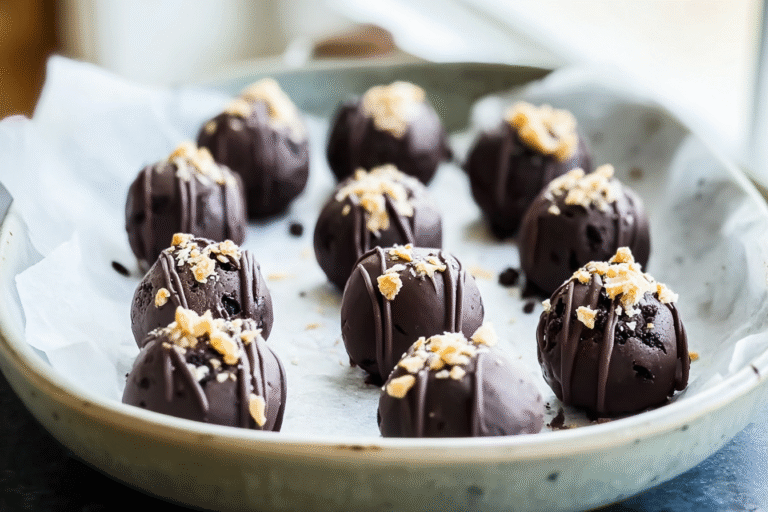
Oreo Cookie Balls
🍪 Oreo Balls offer a rich and creamy texture with the perfect balance of chocolate and cream cheese, making them an irresistible treat.
🍫 Easy to make at home, these truffles are perfect for gifting or enjoying as a delightful dessert bite anytime.
- Total Time: 1 hour 45 minutes
- Yield: Approximately 40 truffles 1x
Ingredients
36 regular sandwich cookies (about 405 grams)
8 ounces (226 grams) of full-fat brick cream cheese, softened to room temperature
12 ounces (339 grams) of semi-sweet or white chocolate
½ teaspoon of vegetable or coconut oil
Optional toppings like sprinkles or crushed cookie crumbs
Instructions
1-How to Prepare the Perfect Oreo Cookie Balls: Making Oreo Cookie Balls is straightforward and fun, starting with simple steps that lead to a delicious result. Begin by processing 36 regular sandwich cookies, including their filling, into fine crumbs using a food processor or by placing them in a sealed bag and crushing with a rolling pin. This creates the perfect base for your truffles, ensuring a consistent texture throughout.
2-Next: beat or pulse these crumbs with 8 ounces of softened full-fat brick cream cheese until fully combined, forming a smooth dough-like mixture. Scoop about one tablespoon (18 22 grams) of the mixture and roll it into balls; if it’s too sticky, refrigerate it for a bit to make handling easier. Place the formed balls on trays lined with parchment paper and chill them for at least 1 hour, or up to 3 days, to firm up or freeze for 30 minutes if you’re short on time.
3-Preparing the Chocolate Coating: While the balls chill, melt 12 ounces of semi-sweet or white chocolate with ½ teaspoon of vegetable or coconut oil in short bursts, stirring until smooth. Let the melted chocolate cool slightly for about 5 minutes to avoid melting the truffle filling during dipping. Dip each ball into the chocolate, making sure it’s fully coated, then return it to the parchment-lined tray.
4-Add optional toppings like sprinkles or crushed cookie crumbs right away while the chocolate is still wet for a nice finish. Finally, chill the coated truffles for at least 1 hour so the chocolate sets properly before serving. This entire process takes about 45 minutes of preparation and around 1 hour and 45 minutes total, including chilling time, making it a quick project for dessert lovers looking for more chocolate treats.
Last Step:
Please leave a rating and comment letting us know how you liked this recipe! This helps our business to thrive and continue providing free, high-quality recipes for you.Notes
❄️ Chill the mixture if too sticky to make rolling easier.
🍫 Allow melted chocolate to cool slightly to prevent melting the truffle centers when dipping.
🎉 Use toppings like sprinkles or crushed cookies to add a decorative touch while the chocolate is still wet.
- Prep Time: 45 minutes
- Chilling time: 1 hour
- Category: Dessert
- Method: No-bake, Dipping
- Cuisine: American
- Diet: Vegetarian
Nutrition
- Serving Size: 1 truffle





