

Why You’ll Love This Dinner Rolls
You guys, imagine pulling warm, fluffy dinner rolls straight from the oven that make your kitchen smell like a cozy bakery heaven! These dinner rolls are a game-changer for anyone craving homemade bread without the hassle. First off, they’re super simple to whip up, perfect for busy evenings when you want something homemade but don’t have hours to spend. Let me share why this recipe stands out and why it’s become my go-to for family dinners.
- Ease of preparation: These dinner rolls come together in just about 22 minutes of active time, making them ideal for home cooks and busy parents. You mix everything in a stand mixer, let the dough rise while you handle other tasks, and bake them up quickly. This means even students or working professionals can enjoy fresh-baked goods without a big time commitment, turning ordinary meals into something special with minimal effort.
- Health benefits: Each serving packs in nutrients like 74 calories, 7g of carbs, and essential vitamins such as Vitamin A and Calcium, offering a balanced treat. These rolls support wellness with their simple ingredients, helping diet-conscious folks enjoy bread without overindulging. Plus, the low sodium and protein content make them a smart choice for everyday eating, especially for seniors looking for lighter options.
- Versatility: You can adapt these dinner rolls to fit various needs, like using them for breakfast, sides, or even sandwiches for travelers and newlyweds. They’re flexible for different occasions, whether you’re a baking enthusiast experimenting or a party host serving a crowd. This adaptability shines during gatherings, letting you customize based on what’s on hand.
- Distinctive flavor: The blend of warm milk, sugar, and butter creates a soft, buttery taste that’s utterly irresistible and elevates any meal. These rolls have that perfect golden-brown crust with a tender inside, making them stand out from store-bought versions. Baking enthusiasts will love how the yeast and sugar work together for that fresh-baked magic.
As you can see, these dinner rolls bring joy to the table with their straightforward process and delicious results. Whether you’re feeding a family or just treating yourself, they’re sure to become a favorite. Keep reading to dive into the ingredients that make them so amazing!
Jump to:
- Why You’ll Love This Dinner Rolls
- Essential Ingredients for Dinner Rolls
- Main Ingredients
- Special Dietary Options
- How to Prepare the Perfect Dinner Rolls: Step-by-Step Guide
- Gathering Your Ingredients
- Mixing and Kneading the Dough
- Adding More Flour and First Rise
- Shaping and Second Rise
- Baking and Finishing Touches
- Dietary Substitutions to Customize Your Dinner Rolls
- Adapting for Allergies and Preferences
- Mastering Dinner Rolls: Advanced Tips and Variations
- Pro Cooking Techniques
- Flavor Variations and More
- How to Store Dinner Rolls: Best Practices
- FAQs: Frequently Asked Questions About Dinner Rolls
- Dinner Rolls
- Ingredients
- Instructions
- Last Step:
- Notes
- Nutrition
- Did you make this recipe?
Essential Ingredients for Dinner Rolls
Main Ingredients
- 4-5 cups all-purpose flour – This forms the base of the dough, providing structure and helping it rise for that perfect soft texture.
- 2 tablespoons rapid rise instant yeast – Acts as the rising agent, quickly activating with warm milk to make the dough light and airy.
- ⅓ cup granulated sugar – Adds sweetness and feeds the yeast, contributing to the rolls’ tender crumb and subtle flavor.
- 1 tsp salt – Balances the sweetness and enhances overall taste, ensuring the rolls aren’t bland.
- 1½ cups warm milk (110 degrees) – Provides moisture and helps activate the yeast, resulting in soft and fluffy rolls.
- 5 tablespoons softened butter – Adds richness and moisture, making the rolls incredibly tender and flavorful.
- 1 room temperature egg – Binds the ingredients and adds extra lift, contributing to the rolls’ golden color and soft interior.
- 2 tablespoons melted butter (for brushing after baking) – Gives the finished rolls a shiny glaze and extra buttery taste.
Special Dietary Options
- Vegan: Swap the milk for a plant-based alternative like almond or oat milk warmed to 110 degrees, and replace the butter with vegan margarine or coconut oil. Use a flax egg (1 tablespoon ground flaxseed mixed with 3 tablespoons water) instead of the egg to keep things plant-based while maintaining texture.
- Gluten-free: Substitute the all-purpose flour with a gluten-free blend, ensuring it includes xanthan gum for proper rising. This adjustment keeps the rolls light, though you might need to add a bit more liquid if the dough seems dry.
- Low-calorie: Reduce the sugar to ¼ cup and use low-fat milk to cut down on calories without losing flavor. Opt for a light butter spread to brush on at the end, making these rolls a lighter option for those watching their intake.
Each ingredient plays a key role in creating those irresistible dinner rolls, and with these options, you can tweak them to suit your lifestyle. Here, you might also enjoy this apple crisp recipe for a complementary dessert that pairs wonderfully with fresh rolls.
How to Prepare the Perfect Dinner Rolls: Step-by-Step Guide
Gathering Your Ingredients
Hey friends, let’s get started on these amazing dinner rolls that will have everyone asking for seconds! First off, pull out all your ingredients and measure them precisely it’s the secret to success. You’ll need 3 cups of your all-purpose flour, 2 tablespoons of rapid rise instant yeast, ⅓ cup granulated sugar, 1 tsp salt, 1½ cups warm milk at 110 degrees, 5 tablespoons softened butter, and 1 room temperature egg. This step sets you up for smooth sailing, especially if you’re a busy parent juggling multiple tasks.
Mixing and Kneading the Dough
Second step: Pop everything into your stand mixer bowl and mix on the lowest speed with the dough hook until the flour is fully incorporated this takes about a minute or so. It’s like watching magic happen as the ingredients come together. Third step: Crank it up to medium speed and beat for 2 minutes to develop that fabulous texture; this is where the dough starts to get nice and elastic.
Adding More Flour and First Rise
Fourth step: Toss in another ½ cup of flour and blend until it’s all mixed in, then repeat with a second ½ cup, mixing for 2 more minutes until the dough forms a ball. If it’s too sticky, add a little more flour bit by bit aim for that slightly sticky feel that pulls away from the bowl edges. Fifth step: Scoop the dough into a greased bowl, cover it up, and let it rise for 30 minutes at room temperature. This resting time is perfect for catching your breath or prepping the rest of your meal.
Shaping and Second Rise
Sixth step: Punch down the dough to release those air bubbles it’s oddly satisfying! Seventh step: Pinch off 24 equal pieces, about 2 ounces each, and shape them into smooth balls; uniformity here means even baking for everyone. Eighth step: Arrange them on a greased baking sheet, cover, and let them rise again for another 30 minutes. While they puff up, preheat your oven to 375°F to get ready for the best part.
Baking and Finishing Touches
Ninth step: Slide those risen rolls into the oven and bake for 12-15 minutes until they’re golden brown; keep an eye on them and tent with foil if they start browning too fast. Tenth step: Once they’re out, brush them immediately with 2 tablespoons of melted butter for that irresistible shine and flavor. Final step: Serve them hot off the sheet for the ultimate comfort, or let them cool and store for up to 3 days if you make extras. With a total time of just 22 minutes active plus resting, these dinner rolls adapt easily for instance, if you’re watching calories, use a low-fat milk option here too.
This guide keeps things straightforward, and remember, practice makes perfect with dinner rolls. If you’re looking for more baking ideas, check out this vanilla cupcakes recipe for a sweet twist.

Dietary Substitutions to Customize Your Dinner Rolls
You know, one of the best things about these dinner rolls is how easy they are to tweak for different tastes and needs! For folks avoiding dairy, try swapping the milk for almond milk and the butter for a plant-based version to keep that creamy texture. If gluten is a concern, a one-to-one gluten-free flour blend works wonders, though you might need to adjust the dough’s moisture. Let’s break it down further for those common swaps.
Adapting for Allergies and Preferences
Starting with vegan options, replace the egg with a flax egg and use coconut oil instead of butter for a dairy-free delight that still rises beautifully. For low-calorie versions, cut back on sugar or opt for a sugar substitute, and choose low-fat milk to lighten things up without sacrificing flavor. These changes make the rolls versatile for food enthusiasts exploring new diets, ensuring everyone at your table can enjoy them.
Mastering Dinner Rolls: Advanced Tips and Variations
Pro Cooking Techniques
Alright, let’s level up your dinner rolls game with some expert advice! First, always measure ingredients ahead to avoid any mix-ups, just like warming your milk to exactly 100-110°F with a thermometer for that yeast activation. Keep the dough in a draft-free spot during rising to ensure even growth, and roll those balls smoothly for a professional look.
Flavor Variations and More
For flavor twists, add herbs like rosemary to the dough or try cinnamon-sugar for a sweet version that pairs great with desserts. Presentation-wise, serve them in a basket with a cloth for that inviting feel, and for make-ahead options, prep the dough up to the second rise and chill it overnight. You’ll wake up to fresh rolls with minimal effort, perfect for party hosts!
How to Store Dinner Rolls: Best Practices
Storing your dinner rolls the right way keeps them fresh and tasty! For refrigeration, wrap them tightly in plastic and chill for up to 4 days to maintain softness. Freezing works great for longer storage; just cool the rolls completely, place in a freezer bag, and they last up to 3 months. When reheating, pop them in a 350°F oven for a few minutes to restore that warmth without drying them out.
For more on nutrition, check out nutritional information on rolls.

FAQs: Frequently Asked Questions About Dinner Rolls
Print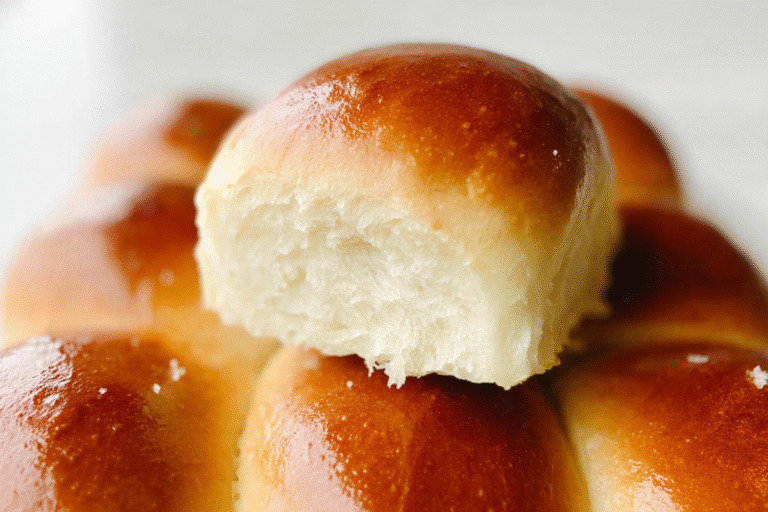
Dinner Rolls
🥖 Discover the secret to bakery-quality dinner rolls with this simple recipe that delivers perfect texture and flavor every time.
🍞 These homemade rolls beat store-bought versions with their soft interior, golden crust, and rich buttery finish.
- Total Time: 1 hour 22 minutes
- Yield: 24 servings
Ingredients
– 4-5 cups all-purpose flour for forming the base of the dough, providing structure and helping it rise
– 2 tablespoons rapid rise instant yeast for acting as the rising agent, quickly activating with warm milk to make the dough light and airy
– ⅓ cup granulated sugar for adding sweetness and feeding the yeast, contributing to the roll’s tender crumb and subtle flavor
– 1 tsp salt for balancing the sweetness and enhancing overall taste, ensuring the rolls aren’t bland
– 1½ cups warm milk (110 degrees) for providing moisture and helping activate the yeast, resulting in soft and fluffy rolls
– 5 tablespoons softened butter for adding richness and moisture, making the rolls incredibly tender and flavorful
– 1 room temperature egg for binding the ingredients and adding extra lift, contributing to the rolls’ golden color and soft interior
– 2 tablespoons melted butter for giving the finished roll a shiny glaze and extra buttery taste
Instructions
1-Gathering Your Ingredients: Hey friends, let’s get started on these amazing dinner rolls that will have everyone asking for seconds! First off, pull out all your ingredients and measure them precisely it’s the secret to success. You’ll need 3 cups of your all-purpose flour, 2 tablespoons of rapid rise instant yeast, ⅓ cup granulated sugar, 1 tsp salt, 1½ cups warm milk at 110 degrees, 5 tablespoons softened butter, and 1 room temperature egg. This step sets you up for smooth sailing, especially if you’re a busy parent juggling multiple tasks.
2-Mixing and Kneading the Dough: Second step: Pop everything into your stand mixer bowl and mix on the lowest speed with the dough hook until the flour is fully incorporated this takes about a minute or so. It’s like watching magic happen as the ingredients come together. Third step: Crank it up to medium speed and beat for 2 minutes to develop that fabulous texture; this is where the dough starts to get nice and elastic.
3-Adding More Flour and First Rise: Fourth step: Toss in another ½ cup of flour and blend until it’s all mixed in, then repeat with a second ½ cup, mixing for 2 more minutes until the dough forms a ball. If it’s too sticky, add a little more flour bit by bit aim for that slightly sticky feel that pulls away from the bowl edges. Fifth step: Scoop the dough into a greased bowl, cover it up, and let it rise for 30 minutes at room temperature. This resting time is perfect for catching your breath or prepping the rest of your meal.
4-Shaping and Second Rise: Sixth step: Punch down the dough to release those air bubbles it’s oddly satisfying! Seventh step: Pinch off 24 equal pieces, about 2 ounces each, and shape them into smooth balls; uniformity here means even baking for everyone. Eighth step: Arrange them on a greased baking sheet, cover, and let them rise again for another 30 minutes. While they puff up, preheat your oven to 375°F to get ready for the best part.
5-Baking and Finishing Touches: Ninth step: Slide those risen rolls into the oven and bake for 12-15 minutes until they’re golden brown; keep an eye on them and tent with foil if they start browning too fast. Tenth step: Once they’re out, brush them immediately with 2 tablespoons of melted butter for that irresistible shine and flavor. Final step: Serve them hot off the sheet for the ultimate comfort, or let them cool and store for up to 3 days if you make extras. With a total time of just 22 minutes active plus resting, these dinner rolls adapt easily for instance, if you’re watching calories, use a low-fat milk option here too.
Last Step:
Please leave a rating and comment letting us know how you liked this recipe! This helps our business to thrive and continue providing free, high-quality recipes for you.Notes
🌡 Warm milk to exactly 100-110°F to activate yeast properly – this is crucial for light, fluffy rolls.
👂 Keep rolls covered during rising periods to prevent drying out and ensure proper oven spring.
🥖 Brush with melted butter immediately after baking while rolls are still hot – this creates the perfect golden, buttery crust.
- Prep Time: 10 minutes
- Resting Time: 1 hour
- Cook Time: 12 minutes
- Category: Bread
- Method: Baking
- Cuisine: American
- Diet: None
Nutrition
- Serving Size: 1 roll
- Calories: 74
- Sugar: 3g
- Sodium: 136mg
- Fat: 4g
- Saturated Fat: 2g
- Unsaturated Fat: 1.5g
- Trans Fat: 0.5g
- Carbohydrates: 7g
- Fiber: 0g
- Protein: 1g
- Cholesterol: 17mg





