

Why You’ll Love This Cherry Pie
Imagine pulling a warm cherry pie from the oven, its buttery crust flaking just right and the filling bursting with sweet-tart flavor. This recipe stands out because it’s simple yet delivers big on taste and satisfaction. Let me walk you through a few reasons why you’ll want to add this cherry pie to your baking routine.
- Ease of preparation: With straightforward steps and common ingredients, this recipe is perfect for busy days. You can have everything ready in about 3 hours of prep time, plus cooking and cooling, making it ideal for home cooks or parents juggling schedules. No fancy tools needed just basic kitchen items and a bit of chilling time to let flavors meld.
- Health benefits: Cherries pack a punch of nutrients, including antioxidants that support heart health and reduce inflammation. Pair that with lemon juice, which adds a zesty boost of vitamin C, and you’re enjoying a treat that feels good from the inside out. For more on how cherries benefit your body, check out this guide on health benefits of cherries.
- Versatility: This pie adapts to various needs, from using fresh or frozen cherries to tweaking for dietary preferences. It’s a hit for family dinners or parties, and you can customize it for gluten-free options or adjust sweetness for different tastes. If you’re into other baked goods, discover more ideas in our post on easy banana nut bread recipes.
- Distinctive flavor: The blend of fresh cherries, a hint of vanilla and almond extract, and a touch of lemon creates a unique taste that’s both comforting and exciting. This isn’t just any pie it’s one that balances sweetness with a subtle tartness, making every bite memorable. Trust me, once you try it, you’ll keep coming back for more slices.
Making this cherry pie is like creating a little joy in your kitchen, especially when you see how it impresses everyone. Overall, it’s a recipe that combines simplicity with rewarding results, perfect for baking enthusiasts looking to shine. Whether you’re a student whipping up a quick dessert or a working professional unwinding after a long day, this pie offers that homemade magic we all crave.
Jump to:
- Why You’ll Love This Cherry Pie
- Essential Ingredients for Cherry Pie
- Special Dietary Options
- How to Prepare the Perfect Cherry Pie: Step-by-Step Guide
- First Step: Prepare the Pie Dough
- Second Step: Mix the Filling
- Third Step: Assemble the Bottom Crust and Add Filling
- Fourth Step: Prepare and Add the Thickened Cherry Juice
- Fifth Step: Top the Pie and Decorate
- Sixth Step: Chill and Bake the Pie
- Final Step: Cool and Serve
- Protein and Main Component Alternatives
- Vegetable, Sauce, and Seasoning Modifications
- Alternative Vegetables
- Sauce and Seasoning Changes
- Mastering Cherry Pie: Advanced Tips and Variations
- Pro Cooking Techniques
- Flavor Variations
- Presentation Tips
- Make-Ahead Options
- How to Store Cherry Pie: Best Practices
- FAQs: Frequently Asked Questions About Cherry Pie
- Cherry Pie
- Ingredients
- Instructions
- Last Step:
- Notes
- Nutrition
- Did you make this recipe?
Essential Ingredients for Cherry Pie
Gathering the right ingredients is the first step to a perfect cherry pie, and each one plays a key role in building that delicious balance of flavors and textures. Below, I’ll list everything you need with precise measurements, along with a quick explanation of why they’re important. This ensures your pie turns out just right every time.
- Pie dough (all-butter or butter and shortening crust) – Forms the flaky base and top that holds the filling together, providing that buttery goodness we love in homemade pies.
- 4.5 cups halved and quartered pitted fresh cherries – Adds the main fruity flavor and moisture; using both halves and quarters helps with the filling’s structure and prevents it from becoming too mushy.
- 2/3 cup granulated sugar – Sweetens the cherries and balances their natural tartness, making the pie irresistible and adjustable based on cherry ripeness.
- 1/4 cup cornstarch – Acts as a thickener to keep the filling from running; it’s essential for that perfect, sliceable consistency.
- 1 tablespoon lemon juice – Brightens the flavors and enhances the cherries’ natural taste while adding a touch of acidity for balance.
- 1 teaspoon pure vanilla extract – Infuses a warm, aromatic note that elevates the overall sweetness of the pie.
- 1/4 teaspoon almond extract – Provides a subtle nutty undertone that complements the cherries without overpowering them.
- 1 tablespoon cold unsalted butter (cut into small cubes) – Adds richness and helps reduce air bubbles in the filling during baking for a smoother result.
- Egg wash (1 large egg beaten with 1 tablespoon milk) – Creates a shiny, golden crust when brushed on, making your pie look as good as it tastes.
- Optional: Coarse sugar for crust topping – Sprinkled on for extra crunch and sparkle, enhancing the pie’s visual appeal and texture if desired.
Special Dietary Options
- Vegan: Swap the pie dough for a plant-based version using vegan butter or shortening, and replace the egg wash with a mix of plant-based milk and a bit of oil for that glossy finish.
- Gluten-free: Use a gluten-free pie dough made from almond flour or a store-bought alternative to keep the structure intact without gluten.
- Low-calorie: Reduce sugar to 1/2 cup and opt for a whole-wheat crust to cut calories while maintaining flavor, ideal for those watching their intake.
How to Prepare the Perfect Cherry Pie: Step-by-Step Guide
Diving into making cherry pie is easier than you might think, and I’ll guide you through each step with clear instructions. Start by pulling together your ingredients and tools to set yourself up for success this is all about enjoying the process while creating something wonderful. Remember, timing is key, so let’s break it down to ensure your pie comes out perfectly baked and full of flavor.
First Step: Prepare the Pie Dough
Begin by making your pie dough using all-butter or a butter and shortening mix, as this creates that flaky texture we all adore. Roll it out on a floured surface and shape it for your pie pan, then chill it in the fridge for at least 2 hours. This step helps the dough firm up, making it easier to handle and preventing shrinkage during baking.
Second Step: Mix the Filling
In a large bowl, combine 4.5 cups of halved and quartered pitted fresh cherries with 2/3 cup granulated sugar, 1/4 cup cornstarch, 1 tablespoon lemon juice, 1 teaspoon pure vanilla extract, and 1/4 teaspoon almond extract. Stir everything gently until the cherries are evenly coated this mixture needs to sit in the fridge for a bit to let the flavors blend. For an extra tip, if you’re using sour cherries, consider bumping up the sugar slightly to keep things sweet.
Third Step: Assemble the Bottom Crust and Add Filling
Once your dough is chilled, roll out the bottom crust and carefully fit it into your pie pan. Pour in the cherry filling, spreading it evenly, then pop the whole thing back in the fridge to set for about 15 minutes. This cooling helps the filling stay put and avoids any messy overflows during baking it’s a simple trick that makes a big difference.
Fourth Step: Prepare and Add the Thickened Cherry Juice
While your pie is chilling, take any reserved cherry juice and reduce it on the stove over medium heat until it thickens, which should take about 5-10 minutes. Let it cool slightly before pouring it over the cherries in the pie. Dot the filling with 1 tablespoon of cold unsalted butter cut into small cubes to add richness and minimize bubbles.
Fifth Step: Top the Pie and Decorate
Roll out your top crust and cut it into strips for a lattice design, or simply place it over the filling if you prefer a full top. Seal the edges, then brush on the egg wash made from 1 large egg beaten with 1 tablespoon milk, and sprinkle with coarse sugar if you’re using it. This step not only enhances the look but also ensures a golden crust bake at 400°F for the first 20 minutes to get that initial rise.
Sixth Step: Chill and Bake the Pie
Refrigerate the assembled pie for 30 minutes to firm everything up before baking this prevents the crust from slumping. Preheat your oven to 400°F, then bake for 20 minutes; reduce the heat to 375°F and continue for 30-40 minutes until the crust is golden and the filling bubbles. Keep an eye on the edges and shield them with foil if they start browning too fast, as this maintains even cooking.
Final Step: Cool and Serve
Once baked, remove the pie from the oven and let it cool completely on a wire rack, which takes about 3-4 hours to set properly. Slice and serve at room temperature or slightly warmed, pairing it with ice cream for a delightful treat. The total prep time is around 3 hours, cooking takes 55 minutes, and including cooling, you’re looking at about 7 hours from start to finish patience here rewards you with the best texture and flavor.
Protein and Main Component Alternatives
When it comes to adapting this cherry pie, think about swapping the main cherry element for other fruits or ingredients based on what you have on hand. For instance, if cherries aren’t available, you could use berries like blueberries or blackberries to keep that fruity vibe. These changes help cater to seasonal finds or personal tastes while maintaining the pie’s core appeal.
- Replace cherries with 4.5 cups of blueberries for a twist that adds a different antioxidant boost.
- Opt for apples if you’re aiming for a heartier option, using about 4 cups sliced and adjusting sugar to taste.
- For a nut-based variation, add chopped almonds to the filling to enhance the almond extract’s flavor naturally.
This keeps the recipe flexible for various dietary needs, like increasing protein with nut additions. If you’re exploring more baking options, check out our recipe for chocolate zucchini bread for similar adaptable ideas.
Vegetable, Sauce, and Seasoning Modifications
While cherry pie focuses on fruit, you can play with additions like veggies for a savory-sweet twist or adjust sauces and seasonings to fit different preferences. For example, incorporating a hint of rhubarb could add a vegetable element that complements the cherries’ tartness. Let’s explore how to tweak these for seasons, diets, or fun variations.
Alternative Vegetables
Adding veggies might sound odd for pie, but items like rhubarb can blend in seamlessly, offering a low-calorie option that pairs well with cherries. Use about 2 cups of chopped rhubarb in place of some cherries to create a unique flavor profile that’s perfect for fall. This modification keeps the pie light and nutrient-dense, appealing to health-conscious eaters.
Sauce and Seasoning Changes
For sauces, you could thicken with tapioca instead of cornstarch for a different texture, or experiment with extracts like orange for a citrusy kick. Seasonings can shift too try cinnamon or nutmeg to warm up the flavors for winter months. These adjustments make the pie versatile for dietary restrictions, such as using sugar-free alternatives for a low-calorie version, as discussed in our ingredients section. According to experts, lemon juice not only adds zest but also brings benefits like improved digestion; learn more at the benefits of lemon juice resource.
Mastering Cherry Pie: Advanced Tips and Variations
Taking your cherry pie to the next level involves some pro techniques and creative twists that can impress your guests. From perfecting the crust to experimenting with flavors, these tips will help you refine your skills. Let’s break it down so you can bake with confidence and add your own flair.
Pro Cooking Techniques
One key technique is shielding the crust edges with foil midway through baking to avoid over-browning, ensuring an even golden finish. Another is making pie dough ahead and freezing it, which saves time on busy days and keeps it fresh. For the best results, always use cold ingredients to maintain that flaky texture we all love.
Flavor Variations
Try adding spices like a dash of cinnamon for a cozy twist, or incorporate chocolate chips into the filling for a decadent option. If you’re feeling adventurous, swap in different extracts such as orange to match seasonal themes. These changes keep the pie exciting and adaptable to various tastes.
Presentation Tips
For a stunning look, focus on a precise lattice top and garnish with fresh cherries or whipped cream. Plating on a rustic board adds charm, making it perfect for parties. Remember, a well-presented pie not only tastes great but also elevates the whole experience. If you’re into more presentation ideas, our post on maple apple breakfast crisp has helpful tips.
Make-Ahead Options
Prepare the dough or even the full pie in advance and freeze it for up to 3 months, thawing as needed. This strategy works wonders for busy schedules, letting you bake fresh pies effortlessly. Always cool completely before storing to preserve quality.
How to Store Cherry Pie: Best Practices
Proper storage keeps your cherry pie fresh and tasty, whether you’re saving leftovers or prepping ahead. Follow these guidelines to maintain its quality and safety. It’s all about extending that homemade goodness without losing flavor.
- Refrigeration: Cover the pie loosely with plastic wrap and store it in the fridge for up to 5 days to keep it moist and prevent spoilage.
- Freezing: Wrap slices individually or the whole pie in foil and freeze for up to 3 months; thaw in the fridge overnight for best results.
- Reheating: Warm slices in a 350°F oven for 10-15 minutes to restore crispness; avoid microwaving to keep the crust from getting soggy.
- Meal Prep Considerations: Batch-bake pies on weekends and store them for quick desserts during the week, ensuring you always have a treat ready.

FAQs: Frequently Asked Questions About Cherry Pie
Print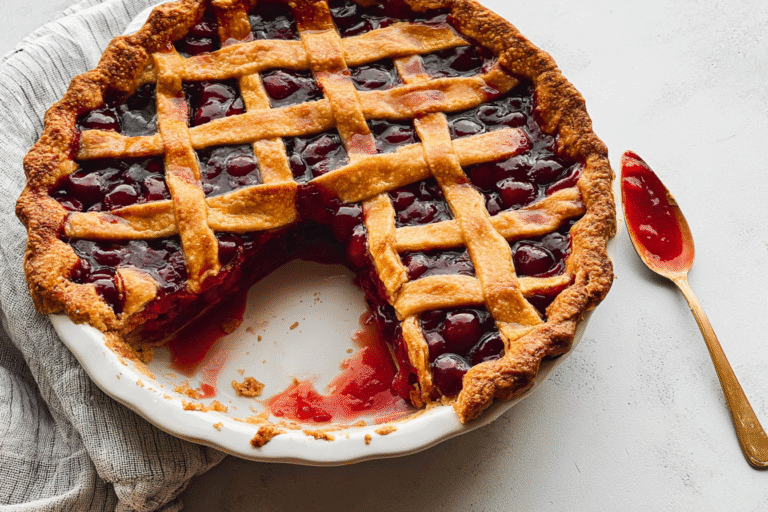
Cherry Pie
🍒 Experience the perfect homemade cherry pie with a flaky crust and juicy fruit filling that captures summer in every bite.
🥧 This simple recipe delivers bakery-quality results with fresh cherries and a foolproof lattice crust technique.
- Total Time: 7 hours
- Yield: 8 servings
Ingredients
– Pie dough
– 4.5 cups halved and quartered pitted fresh cherries
– 2/3 cup granulated sugar
– 1/4 cup cornstarch
– 1 tablespoon lemon juice
– 1 teaspoon pure vanilla extract
– 1/4 teaspoon almond extract
– 1 tablespoon cold unsalted butter
– Egg wash (1 large egg beaten with 1 tablespoon milk)
– Coarse sugar for crust topping
Instructions
1-First Step: Prepare the Pie Dough: Begin by making your pie dough using all-butter or a butter and shortening mix, as this creates that flaky texture we all adore. Roll it out on a floured surface and shape it for your pie pan, then chill it in the fridge for at least 2 hours. This step helps the dough firm up, making it easier to handle and preventing shrinkage during baking.
2-Second Step: Mix the Filling: In a large bowl, combine 4.5 cups of halved and quartered pitted fresh cherries with 2/3 cup granulated sugar, 1/4 cup cornstarch, 1 tablespoon lemon juice, 1 teaspoon pure vanilla extract, and 1/4 teaspoon almond extract. Stir everything gently until the cherries are evenly coated this mixture needs to sit in the fridge for a bit to let the flavors blend. For an extra tip, if you’re using sour cherries, consider bumping up the sugar slightly to keep things sweet.
3-Third Step: Assemble the Bottom Crust and Add Filling: Once your dough is chilled, roll out the bottom crust and carefully fit it into your pie pan. Pour in the cherry filling, spreading it evenly, then pop the whole thing back in the fridge to set for about 15 minutes. This cooling helps the filling stay put and avoids any messy overflows during baking it’s a simple trick that makes a big difference.
4-Fourth Step: Prepare and Add the Thickened Cherry Juice: While your pie is chilling, take any reserved cherry juice and reduce it on the stove over medium heat until it thickens, which should take about 5-10 minutes. Let it cool slightly before pouring it over the cherries in the pie. Dot the filling with 1 tablespoon of cold unsalted butter cut into small cubes to add richness and minimize bubbles.
5-Fifth Step: Top the Pie and Decorate: Roll out your top crust and cut it into strips for a lattice design, or simply place it over the filling if you prefer a full top. Seal the edges, then brush on the egg wash made from 1 large egg beaten with 1 tablespoon milk, and sprinkle with coarse sugar if you’re using it. This step not only enhances the look but also ensures a golden crust bake at 400°F for the first 20 minutes to get that initial rise.
6-Sixth Step: Chill and Bake the Pie: Refrigerate the assembled pie for 30 minutes to firm everything up before baking this prevents the crust from slumping. Preheat your oven to 400°F, then bake for 20 minutes; reduce the heat to 375°F and continue for 30-40 minutes until the crust is golden and the filling bubbles. Keep an eye on the edges and shield them with foil if they start browning too fast, as this maintains even cooking.
7-Final Step: Cool and Serve: Once baked, remove the pie from the oven and let it cool completely on a wire rack, which takes about 3-4 hours to set properly. Slice and serve at room temperature or slightly warmed, pairing it with ice cream for a delightful treat. The total prep time is around 3 hours, cooking takes 55 minutes, and including cooling, you’re looking at about 7 hours from start to finish patience here rewards you with the best texture and flavor.
Last Step:
Please leave a rating and comment letting us know how you liked this recipe! This helps our business to thrive and continue providing free, high-quality recipes for you.Notes
🍒 Use halved and quartered cherries together for better filling structure and texture throughout the pie.
🌡 Thicken cherry juice on stove before adding to filling to prevent runny pie that doesn’t set properly.
🥧 Dot filling with small butter pieces to minimize bubbles during baking and create smoother texture.
- Prep Time: 3 hours
- Cooling Time: 2 hours
- Cook Time: 55 minutes
- Category: Dessert
- Method: Baking
- Cuisine: American
- Diet: None
Nutrition
- Serving Size: 1 slice
- Calories: 320
- Sugar: 25g
- Sodium: 150mg
- Fat: 14g
- Saturated Fat: 8g
- Unsaturated Fat: 5g
- Trans Fat: 0.5g
- Carbohydrates: 45g
- Fiber: 2g
- Protein: 3g
- Cholesterol: 25mg





