

Why You’ll Love This Cherry Cheesecake Bars
Picture this: you’re craving something sweet and simple that comes together in no time at all, and that’s exactly what these cherry cheesecake bars offer! They’re perfect for busy days when you want a treat without spending hours in the kitchen, and I bet you’ll find yourself making them over and over again. Let me share why these cherry cheesecake bars are such a hit for home bakers like you.
- Ease of preparation: These cherry cheesecake bars whip up in just about 55 minutes total, with only 15 minutes of prep work, making them ideal for busy parents and students who need quick desserts. You’ll appreciate how straightforward the steps are, from mixing the crust to baking the filling, so you can enjoy fresh treats without fuss. This simplicity means anyone, even baking beginners, can create these bars and impress their family.
- Health benefits: Each serving packs in nutrients like 146mg of potassium and vitamins A and C from the cherries, which can support your daily wellness goals. For diet-conscious folks, these bars provide a balance with 5g of protein and only 17g of sugar, helping you indulge while staying mindful of calories at just 351 kcal per bar. It’s a tasty way for food enthusiasts to enjoy something sweet that’s not overly heavy.
- Versatility: You can tweak these cherry cheesecake bars to fit various dietary needs, like using gluten-free graham crackers for those with restrictions or swapping in plant-based cream cheese for vegan options. This adaptability makes them great for travelers, newlyweds, or party hosts who want to customize treats for different crowds. Plus, they travel well for picnics or work lunches!
- Distinctive flavor: The combination of creamy cheesecake and tart cherry topping creates a burst of flavor that’s hard to beat, reminding me of cozy family gatherings. These bars stand out with their smooth texture and fresh taste, perfect for seniors or working professionals looking for a comforting dessert. It’s that perfect blend of sweet and tangy that keeps everyone coming back for more.
As you can see, these cherry cheesecake bars aren’t just delicious they’re practical and fun to make! Whether you’re a baking enthusiast or just trying something new, this recipe fits right into your routine. You’ll love how it brings a smile to your face with every bite.
Jump to:
- Why You’ll Love This Cherry Cheesecake Bars
- Essential Ingredients for Cherry Cheesecake Bars
- Main Ingredients
- Special Dietary Options
- How to Prepare the Perfect Cherry Cheesecake Bars: Step-by-Step Guide
- First Step: Get Everything Ready
- Second Step: Make the Crust
- Third Step: Prepare the Filling
- Fourth Step: Assemble and Bake
- Fifth Step: Cool and Chill
- Sixth Step: Cut and Serve
- Protein and Main Component Alternatives
- Vegetable, Sauce, and Seasoning Modifications
- Mastering Cherry Cheesecake Bars: Advanced Tips and Variations
- Pro Cooking Techniques
- Flavor Variations
- Make-Ahead Options
- How to Store Cherry Cheesecake Bars: Best Practices
- FAQs: Frequently Asked Questions About Cherry Cheesecake Bars
- Cherry Cheesecake Bars
- Ingredients
- Instructions
- Last Step:
- Notes
- Nutrition
- Did you make this recipe?
Essential Ingredients for Cherry Cheesecake Bars
Gathering the right ingredients is the first step to nailing these cherry cheesecake bars, and I’ve got everything you need listed out clearly below. Each one plays a key role in creating that creamy texture and burst of flavor, so let’s dive in! I’ll explain why each ingredient matters to help you understand how they come together.
Main Ingredients
- 1 ½ cups graham cracker crumbs – This forms the base of the crust, providing a crunchy foundation that holds everything together nicely.
- ¼ cup granulated sugar – Used in the crust for a touch of sweetness and to help bind the crumbs, making it easier to press into the pan.
- ¼ cup salted butter (melted) – Adds richness and helps the crust set properly, giving it that buttery flavor we all love.
- 16 ounces cream cheese (softened) – The star of the filling, it creates a smooth, creamy texture that’s essential for the cheesecake’s luxurious feel.
- ½ cup sugar – Sweetens the filling just right, balancing the tanginess of the cream cheese for a perfectly decadent result.
- ¼ cup sour cream – Brings extra creaminess and a slight tang, which helps make the filling rich and velvety.
- 2 tablespoons heavy cream – Adds moisture and smoothness to the filling, ensuring it blends effortlessly for a light, airy texture.
- 3 large eggs (room temperature) – Help the filling set during baking, providing structure while keeping it tender and not too dense.
- 2 teaspoons vanilla extract – Infuses a warm, aromatic flavor that enhances the overall taste of the cheesecake bars.
- 1 can cherry pie filling – Tops off the bars with a sweet and fruity finish, adding a pop of color and freshness that makes them irresistible.
Special Dietary Options
- Vegan: Swap the cream cheese for a plant-based version, use vegan butter instead of salted butter, and opt for a flax egg substitute (like 1 tablespoon ground flaxseed mixed with 3 tablespoons water per egg) to keep things creamy and cruelty-free.
- Gluten-free: Choose gluten-free graham cracker crumbs to make the crust safe for those with gluten sensitivities, ensuring the whole recipe remains enjoyable without any wheat worries.
- Low-calorie: Reduce sugar amounts slightly or use a low-calorie sweetener in place of granulated sugar, and pick a light sour cream to cut down on fats while still enjoying the bars’ great taste.
Remember, these ingredients are key to getting that perfect cherry cheesecake bars experience, and with a few swaps, you can make them work for your needs!
How to Prepare the Perfect Cherry Cheesecake Bars: Step-by-Step Guide
Ready to make these cherry cheesecake bars? They’re so easy and fun that you’ll want to try them right away! I’ll walk you through each step with clear instructions, including times and tips to help you succeed. This guide uses the fresh ingredients we discussed, and I’ll note ways to adapt for different preferences along the way.
First Step: Get Everything Ready
Start by preheating your oven to 325°F and lining a 9×9-inch pan with parchment paper, leaving some overhang for easy removal later. Spray the pan with a bit of pan spray to prevent sticking. This prep takes about 5 minutes and ensures your bars come out neatly. For dietary tweaks, if you’re going gluten-free, double-check your graham cracker crumbs now.
Second Step: Make the Crust
Mix 1 ½ cups graham cracker crumbs, ¼ cup granulated sugar, and ¼ cup melted salted butter in a bowl until it looks like wet sand this should take just a minute or two. Press this mixture firmly into the bottom of your prepared pan to form an even layer. Bake it for 10 minutes, then let it cool completely on a wire rack. This step builds a sturdy base, and if you want a nuttier twist, you could add in some ground almonds for extra flavor.
Third Step: Prepare the Filling
In a large mixing bowl, beat 16 ounces of softened cream cheese until it’s completely smooth, which helps avoid lumps. Add ½ cup sugar, ¼ cup sour cream, 2 tablespoons heavy cream, and 2 teaspoons vanilla extract, then beat until everything combines nicely this might take about 2 minutes. For a lower-fat version, swap the heavy cream with a non-dairy alternative here. Next, add the 3 large room-temperature eggs one at a time, beating well after each to incorporate air and keep the texture light.
Fourth Step: Assemble and Bake
Pour the smooth filling over your cooled crust in the pan, spreading it evenly. Pop the pan into your preheated 325°F oven and bake for 28-30 minutes, or until the center is set but still has a slight wobble like a gentle jiggle in the middle. This baking time ensures the bars are creamy inside without overcooking. If you’re making a vegan version, keep an eye on it as plant-based ingredients might bake a tad faster.
Fifth Step: Cool and Chill
Once baked, let the bars cool to room temperature on a wire rack, which takes about 30 minutes. Then, cover the pan and refrigerate it for at least 2 hours or overnight for the best results to firm up the filling. This chilling step is crucial for that perfect sliceable texture. For busy parents, this is a great make-ahead option to prep in the evening.
Sixth Step: Cut and Serve
Remove the bars from the pan using the parchment overhang, then cut them into 9 or 12 squares with a sharp knife. For clean cuts, run the knife under hot water and dry it between slices. Top each bar with 2 tablespoons of cherry pie filling for that fresh, fruity finish. Explore more bar recipes like our breakfast bars for inspiration! Serve them up at your next gathering, and watch everyone light up with excitement.
This whole process is straightforward and rewarding, clocking in at about 55 minutes total. Once you try it, you’ll see how versatile these cherry cheesecake bars can be for your family’s tastes.
Protein and Main Component Alternatives
When making cherry cheesecake bars, swapping out the main components can make them fit your dietary needs or what you have on hand. For instance, the cream cheese is the primary protein source, so consider using Greek yogurt as a lighter alternative it adds a tangy protein boost while cutting calories. If you’re looking for more plant-based options, tofu can replace cream cheese for a vegan twist, giving the bars a similar creamy texture without the dairy.
For the eggs, which help bind the filling, try using applesauce or mashed banana for a natural binder that works well in egg-free versions perfect for those with allergies. You could also incorporate banana-based recipes for ideas on how to integrate these swaps smoothly. These changes keep the bars delicious and adaptable for everyone from students to health-focused eaters.
Vegetable, Sauce, and Seasoning Modifications
While cherry cheesecake bars don’t feature many vegetables, you can get creative with additions like spinach or zucchini for a nutrient-packed twist think blending in some finely grated zucchini for moisture without altering the taste much. For sauces, swap the cherry pie filling with berry compote or a homemade apple sauce to match seasonal flavors, which is great for travelers seeking fresh options. Seasonings can vary too; add a dash of cinnamon or nutmeg to the crust for a warm, spicy note that elevates the flavor.
If you’re dealing with dietary restrictions, use sugar-free sauces to keep things low-calorie, or opt for herbal infusions like mint in the topping for a refreshing change. These tweaks make the bars versatile for party hosts or baking enthusiasts experimenting in the kitchen.
Mastering Cherry Cheesecake Bars: Advanced Tips and Variations
Taking your cherry cheesecake bars to the next level is all about fine-tuning the details, and I’ve got some pro tips to make that happen! First, always use full-fat cream cheese and sour cream for the best texture they blend smoother and give a richer taste that really shines through.
Pro Cooking Techniques
Beat your ingredients at room temperature to avoid lumps, and don’t overmix once the eggs go in to keep the filling from cracking. For presentation, cut the bars with a hot knife for clean edges that make them look store-bought.
Flavor Variations
Experiment with different pie fillings like apple or blueberry for a seasonal twist, or add a teaspoon of lemon juice to the cherries for extra tartness. You can also mix in chocolate chips for a decadent variation that pairs well with the creamy base.
Make-Ahead Options
Prep the crust ahead and store it in the fridge, or freeze the baked bars for up to three months so you always have a treat ready. This is perfect for working professionals with packed schedules!
With these tips, your cherry cheesecake bars will turn out amazing every time, adding excitement to your baking adventures.
How to Store Cherry Cheesecake Bars: Best Practices
Keeping your cherry cheesecake bars fresh is easy with the right storage methods, so let’s cover the basics to maintain their taste and texture. Start with refrigeration for short-term needs, as it keeps them safe and delicious.
- Refrigeration: Store the bars in an airtight container in the fridge for up to 7 days to preserve their creamy goodness that way, you can grab a snack anytime.
- Freezing: For longer storage, freeze sliced bars on a parchment-lined sheet for 2 hours, then transfer to an airtight container layered with parchment; they last up to 3 months and thaw overnight in the fridge.
- Reheating: If you want to warm them, let them sit at room temperature for 10-15 minutes or use a low-heat oven to gently revive the flavor without making them soggy.
- Meal Prep Considerations: These bars are ideal for batch cooking, so portion them out for easy grab-and-go options during your busy week.
Follow these steps, and your cherry cheesecake bars will stay as tasty as the day you made them!

FAQs: Frequently Asked Questions About Cherry Cheesecake Bars
Print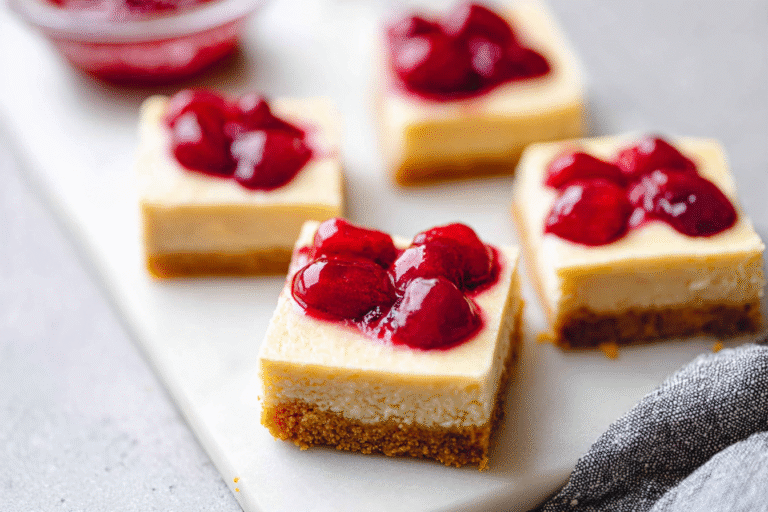
Cherry Cheesecake Bars
🍒 Enjoy the perfect balance of creamy cheesecake and sweet cherries in these easy-to-make bars that deliver restaurant-quality taste at home.
🍰 These quick and easy dessert bars offer a delightful combination of crunchy graham cracker crust and rich filling that will satisfy any sweet tooth.
- Total Time: 55 minutes
- Yield: 9-12 bars
Ingredients
– 1 ½ cups graham cracker crumbs for forming the base of the crust
– ¼ cup granulated sugar for crust sweetness and binding
– ¼ cup salted butter (melted) for richness and helping crust set
– 16 ounces cream cheese (softened) for creating a smooth, creamy texture
– ½ cup sugar for sweetening the filling
– ¼ cup sour cream for extra creaminess and tang
– 2 tablespoons heavy cream for moisture and smoothness
– 3 large eggs (room temperature) for helping the filling set
– 2 teaspoons vanilla extract for warm, aromatic flavor
– 1 can cherry pie filling for sweet and fruity finish
Instructions
1-First Step: Get Everything Ready Start by preheating your oven to 325°F and lining a 9×9-inch pan with parchment paper, leaving some overhang for easy removal later. Spray the pan with a bit of pan spray to prevent sticking. This prep takes about 5 minutes and ensures your bars come out neatly. For dietary tweaks, if you’re going gluten-free, double-check your graham cracker crumbs now.
2-Second Step: Make the Crust Mix 1 ½ cups graham cracker crumbs, ¼ cup granulated sugar, and ¼ cup melted salted butter in a bowl until it looks like wet sand this should take just a minute or two. Press this mixture firmly into the bottom of your prepared pan to form an even layer. Bake it for 10 minutes, then let it cool completely on a wire rack. This step builds a sturdy base, and if you want a nuttier twist, you could add in some ground almonds for extra flavor.
3-Third Step: Prepare the Filling In a large mixing bowl, beat 16 ounces of softened cream cheese until it’s completely smooth, which helps avoid lumps. Add ½ cup sugar, ¼ cup sour cream, 2 tablespoons heavy cream, and 2 teaspoons vanilla extract, then beat until everything combines nicely this might take about 2 minutes. For a lower-fat version, swap the heavy cream with a non-dairy alternative here. Next, add the 3 large room-temperature eggs one at a time, beating well after each to incorporate air and keep the texture light.
4-Fourth Step: Assemble and Bake Pour the smooth filling over your cooled crust in the pan, spreading it evenly. Pop the pan into your preheated 325°F oven and bake for 28-30 minutes, or until the center is set but still has a slight wobble like a gentle jiggle in the middle. This baking time ensures the bars are creamy inside without overcooking. If you’re making a vegan version, keep an eye on it as plant-based ingredients might bake a tad faster.
5-Fifth Step: Cool and Chill Once baked, let the bars cool to room temperature on a wire rack, which takes about 30 minutes. Then, cover the pan and refrigerate it for at least 2 hours or overnight for the best results to firm up the filling. This chilling step is crucial for that perfect sliceable texture. For busy parents, this is a great make-ahead option to prep in the evening.
6-Sixth Step: Cut and Serve Remove the bars from the pan using the parchment overhang, then cut them into 9 or 12 squares with a sharp knife. For clean cuts, run the knife under hot water and dry it between slices. Top each bar with 2 tablespoons of cherry pie filling for that fresh, fruity finish. Explore more bar recipes like our breakfast bars for inspiration! Serve them up at your next gathering, and watch everyone light up with excitement.
Last Step:
Please leave a rating and comment letting us know how you liked this recipe! This helps our business to thrive and continue providing free, high-quality recipes for you.Notes
🧈 Use full-fat cream cheese and sour cream for the best texture and creamiest result.
🌡 Ensure all filling ingredients are at room temperature for smooth blending and perfect consistency.
🔪 Cut bars with a hot knife (run under hot water, dry, repeat between cuts) for clean, professional-looking slices.
- Prep Time: 15 minutes
- Cook Time: 40 minutes
- Cook Time: 40 minutes
- Category: Dessert
- Method: Baking
- Cuisine: American
- Diet: Vegetarian
Nutrition
- Serving Size: 1 bar
- Calories: 351
- Sugar: 17g
- Sodium: 245mg
- Fat: 21g
- Saturated Fat: 12g
- Unsaturated Fat: 7g
- Trans Fat: 0.2g
- Carbohydrates: 37g
- Fiber: 1g
- Protein: 5g
- Cholesterol: 95mg





